Installation Process for Vinyl Replacement Windows
The night before our new windows and doors arrived,
neither my husband nor I slept very well. We were excited and anxious:
were they worth it? Would they live up to our expectations? Would
they really add significant value to our home? The thoughts swam
through our minds as we prepared to embark upon our biggest home
improvement expense--in fact, it was the most money we'd ever spent
on any one item outside of our home and cars. We hoped they were
all we expected them to be.
Preparing for the Installation
Aside from not sleeping, we spent the prior
night moving furniture and removing the wood blinds from the windows.
This was a not a fun project and reminded us of how much of a pain
actual moving can be. The blinds issue had caused us some concern;
we'd received conflicting information as to whether they would fit
back properly once the new windows were installed. One company told
us unequivocally the blinds would not fit after any new windows (not
just theirs) were installed and any sales rep who did not tell us
that did not deserve our business. We crossed our fingers on that
one.
The Crews Arrive
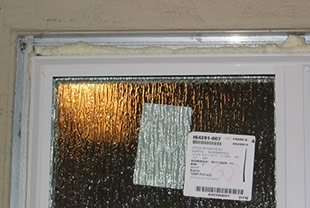
Foam is used to fill the gaps between the new vinyl window and the old aluminum frame. The company had given us a two-hour window
for the installers' arrival and we hoped they would come before my
husband left for work. Just as he was leaving, they pulled up with
all seven windows and three sliding doors loaded on one truck! We
met the foreman who reviewed the job with us and answered some last-minute
questions. The team of four men began work immediately, popping out
the old windows like Legos and installing the bathroom window inside
of fifteen minutes! We had been told it would probably be a two-day
job, but at the rate they were going, it looked like they might be
done in a few hours.
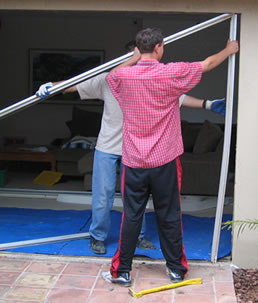
For sliding patio doors, the original frame has to be removed. This can usually be done without causing any damage to exterior stucco or siding. I remained home throughout the installation process, leaving only
to pick up my daughter from preschool for a short while. The installers
were professional and hard-working (though they did smoke periodically).
They didn't bring a radio, didn't waste time chatting, bother me
or do anything else than work and take a lunch break late in the
day. I checked on them surreptitiously a few times and noticed one
of the new sliding doors was causing a great deal of conversation
and mild debate. I don't speak their language, so I couldn't understand
the issue, but they worked on the door for a couple of hours with
various tools and installed it seemingly without difficulty. I never
asked what the problem was and hopefully it will never manifest
itself in the door!
It's interesting to note that the sliding patio doors are installed very differently than the windows. With the windows, the original aluminum frame remains in place, but with the doors it is removed. It seemed to come off easily after removing a few screws and it did not cause any damage to the stucco on the outide of the house.
At another point in the day I noticed the bottom of the newly installed
kitchen window had been cut in order to fit the sill correctly.
However, the window did not line up with the sill perfectly and
there were several areas with slight gaps. It looked jagged and
unfinished. I realized, however, that it wasn't the fault of the
window or installers; rather, the sill's unevenness was causing
the problem. When I checked back on the window later in the day,
the caulking in the gaps had made it look seamless and perfect.
The installers were neat, laying down tarps at their work areas
and vacuuming at the end of the day. I did find two shards of glass
on the floor, luckily before my toddler's bare feet did. That night
I vacuumed every area where the workers had been, just to be sure
no glass was left.
Assessing the Work
The group finished about nine hours after they
started, leaving the house as they found it. My husband reviewed the
job with the foreman and found several things that needed correcting.
For example, they'd forgotten to install two screens, had left some
plastic tabs sticking out of a sliding door and neglected to install
the vent lock on the kitchen window. The most serious issue, however,
involved the security of the windows. When the salesperson had met
with us, he explained the windows could not be lifted out of their
tracks if they were in the "locked vent" position (open
about three inches but locked into place). We found this not to be
the case. The windows lifted out easily, which obviously is a major
security concern. We expressed our displeasure with this to the foreman,
who said the special "thin frame" windows we had ordered
are able to be lifted out of their tracks in the locked vent position.
The salesperson had never told us this. The foreman also told us about
a simple solution to address the problem. He suggested partially drilling
a screw into the top frame of the window to prevent it from being
lifted out unless it was fully open. My husband was already aware
of this technique as he had done this very thing on our old aluminum
windows, but we did not feel it was our responsibility to finish this
part of the job. Besides, we were not sure whether this would invalidate
some or all of the warranty.
We decided to withhold part of the balance due because of this issue. My husband
contacted the salesperson the next day about it. He said he’d
never heard of this problem but agreed to make an addendum to the
warranty so my husband could do the modifications. Once the issue
was resolved, we paid the remainder of our bill.
< PREV: Building
Codes, Permits and Fire Codes | NEXT: Life
with Our New Vinyl Windows >
|
